Showing posts with label Cooks Illustrated. Show all posts

Wednesday, November 11, 2015

big and chewy Oatmeal Chocolate Chunk Cookies and ramblings . . .


It feels like it's been weeks since I've sat down and shared a recipe or any 'at home' happenings. 

I've been happily busy the last few weeks with school parties and Halloween. Did you happen to see the photo I shared on my Instagram of the 5-inch pumpkin shaped sugar cookies I baked for Charley and Ford's classes? 

Little Lauren and I baked 54+ sugar cookies! 

I under-estimated the amount of batter and number of hours it would take to complete this baking project, but it was well-worth the energy and time! I had so much fun decorating them with their classmates . . . and Charley and Ford loved sharing one of our family traditions with their friends.
I feel so blessed to be a stay-at-home mom, as well as a Room Mom for Charley and Ford's classes this year!  


My 'TO DO list' is crazy long since returning home from an annual girls trip to Solvang with my mom and sister a few days ago. I managed to unpack, clean the house, and tackle 6 loads of laundry yesterday ((which is a relief!)), knowing that I'm going to have to spend the remainder of the week planning, organizing, and shopping for one of my busiest baking months of the year.

I have an order due for delivery next week that consists of 355+ baked goods, including cookies, muffins, and biscotti. Orders of this size require a crazy amount of planning and organizing to ensure a successful delivery.

I'm really excited to share many of the cookie and biscotti recipes with you over the coming weeks! They would make great additions to any holiday party or cookie exchange. 

Countless hours have been spent in this cozy chair (below) gathering recipes, writing lists, and ordering supplies for the upcoming orders. 


These amazing big and chewy oatmeal chocolate chunk cookies will be a few of many cookie varieties included in 20 gift baskets to be delivered early next week.

The photos in this post are of the ones that I made for my sister's birthday last weekend. We took them on our trip . . . and my mom and sister enjoyed them when they craved something hearty and sweet. The recipe calls for 3 cups of good old-fashioned rolled OATS! 

My sister took a bite of one of them and asked me, "So what is this cookie called? HEAVEN in my mouth!?" I'm pretty sure I laughed out loud. And yes, they're really that good!!

They're another WINNER from Cook's Illustrated. 

What I love about them - besides that the recipe calls for 3 cups of old-fashioned oats (NO quick-cook oats here!) - is that NUTMEG is the spice of choice, instead of cinnamon. It's definitely not your typical oatmeal cookie ingredient, but it's PERFECTION paired with the flavor of the OATS. 

I made them BIG! . . . because that's how I think oatmeal cookies should be. 

These photos are a little deceiving, as they don't show the actual size. I made them using a 1/4-cup ice cream scoop. So they really are  . . . BIG, thick, and chewy! 


I couldn't think of a better way to spend a cozy Fall or Winter evening than with a warm batch of Cook's Illustrated's big and chewy Oatmeal Chocolate Chunk Cookies. I hope you enjoy the recipe, too!


thick and chewy 
Oatmeal Chocolate Chunk Cookies
 .     .     .     .    .     .
1 1/2 cups all-purpose flour
1/2 teaspoon baking powder
1/2 teaspoon salt
1/4 teaspoon freshly grated nutmeg
2 sticks unsalted butter, at room temperature
1 cup packed light brown sugar
1 cup granulated sugar
2 large eggs, at room temperature
3 cups old-fashioned oats *NOT instant or quick-cook oats
1 1/2 cups chocolate chunks
 .     .     .     .    .     .

Preparation
Preheat oven to 350 F. Line two baking sheets with parchment.

In a medium bowl, whisk together the flour, baking powder, salt and nutmeg. In the bowl of a stand mixer fitted with the paddle attachment, cream the butter and both sugars on medium speed until light and fluffy, about 3 minutes.

Add the eggs, one at a time, until well combined. With the mixer on low, gradually add the dry ingredients, beating just until combined. Mix in the oats and chocolate chunks until evenly distributed in the dough.

Divide the dough into 2 tablespoon balls and place on the prepared baking sheets, leaving 2 inches between them. Bake for about 15-18 minutes, or until the edges of the cookies are golden brown (the centers will still be pale – don’t over-bake).

Transfer the baking sheet to a wire rack and let the cookies cool a few minutes before removing them to the rack to cool completely. Repeat with remaining dough (be sure to let the baking sheet cool in between batches).

Store in an airtight container at room temperature.
Makes about 18 cookies
courtesy Cook's Illustrated


LET'S STAY in touch!
.      .      .      .      .


Thank you for stopping by!
I love reading your comments and appreciate them so much!


Wednesday, May 20, 2015

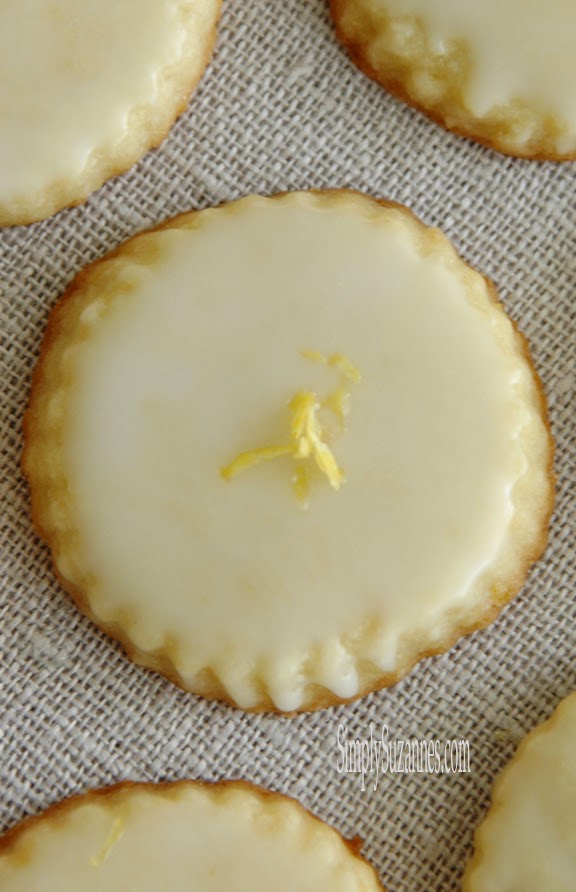
glazed lemon cookies


Our oldest daughter's teacher gave our family a bag of beautiful lemons from a lemon tree that's growing on campus.

I was so delighted!


You can always find lemons, oranges, blackberries/strawberries/and blueberries in my fridge. I use the citrus in my cooking and baking, and my kids love their berries!

I use lemon zest (and a splash of lemon juice) in many of  my dishes, dressings, and desserts.

With so many gifted lemons, I thought it would be fun to make (my favorite) glazed lemon cookies and an amazingly moist and tender lemon bundt cake to share with our neighbors and teachers.


The glazed lemon cookie recipe is one of my favorites, and comes from my loved and trusted Cooks Illustrated Cookbook.

What makes them so special is that they're a combination of a sugar cookie and shortbread. They're tender, slightly chewy, buttery, and lemony.


You can finish them with, or without, a glaze. I actually prefer them without the glaze, but my husband and kids like the extra sweetness that the glaze gives this delightful cookie.

I top the glazed cookies with a few specks of lemon zest for a beautiful finish when I make them to give as a gift, or when I serve them at a bridal or baby shower.


And if you love a cup of hot herbal tea at the end of a long day, then this is your cookie!


Glazed Lemon Cookies
Cookies
¾ cup granulated sugar
2 tablespoons grated zest, plus 2 tablespoons juice from 2 lemons
1¾ cup all-purpose flour
¼ teaspoon baking powder
¼ teaspoon salt
12 tablespoons (1½ sticks) cold unsalted butter, cut into ½-inch cubes
1 large egg yolk
½ teaspoon vanilla extract

Cookie preparation
In a food processor, process the granulated sugar and lemon zest until the sugar looks damp and the zest is thoroughly incorporated, about 30 seconds. 

Add the flour, baking powder, and salt; pulse to combine, about ten 1-second pulses. Scatter the butter pieces over the dry ingredients; pulse until the mixture resembles fine cornmeal, about fifteen 1-second pulses. 

In a measuring cup or small bowl, beat together the lemon juice, egg yolk, and vanilla with a fork to combine. 

With the machine running, add the juice mixture in a slow, steady stream (the process should take about 10 seconds); continue processing until the dough begins to form a ball, 10 to 15 seconds longer.

Turn the dough and any dry bits onto a clean work surface; working quickly, gently knead to ensure that no dry bits remain and the dough is homogeneous. 

Roll the dough into a cylinder approximately 10 inches long and 2 inches in diameter. Center the dough on a piece of parchment. Fold the paper over the dough. Grasp one end of the parchment. With the other hand, use a bench scraper to firmly press the parchment against the dough to form a uniform cylinder. Roll the parchment and twist the ends together to form a tight seal. 

Chill the dough until firm and cold, about 45 minutes in the freezer or 2 hours in the refrigerator. (The dough will keep in the refrigerator for up to 3 days or in the freezer for up to 2 weeks.)

Meanwhile, adjust the oven racks to the upper- and lower-middle positions; heat the oven to 375 degrees.

Line 2 large baking sheets with parchment paper or spray them with nonstick cooking spray. 

Remove the dough log from its wrapper and, using a sharp chef’s knife, slice the dough into rounds 3/8 inch thick; place the rounds on the prepared baking sheets, spacing them about 1 inch apart. Bake until the centers of the cookies just begin to color and the edges are golden brown, 14 to 16 minutes, rotating the baking sheets front to back and top to bottom halfway through the baking time. 

Cool the cookies on the baking sheets about 5 minutes; using a wide metal spatula, transfer the cookies to a wire rack and cool to room temperature before glazing.
recipe courtesy of Cook's Illustrated

lemon glaze 
.     .     .     .     .     .
1 tablespoon cream cheese, softened
2 tablespoons juice from 1 lemon
1½ cups (6 ounces) confectioners’ sugar
.     .     .     .     .     .
When the cookies have cooled, spoon a scant teaspoon of glaze onto each cookie 
and spread evenly with the back of the spoon.
*I prefer to use a pastry brush, and lightly brush a THIN coat of glaze on top. 
Let the cookies stand on a wire rack until the glaze is set and dry, about 1 hour. 
The cookies are best eaten the day they are glazed.


I use the 2-inch cookie cutter from the Williams Sonoma fluted cutter set when I make these cookies. I love the ruffled edges!
You can see more of my 'at home' Kitchen Essentials here


Thursday, December 4, 2014

thick and chewy triple chocolate cookies!


These are - hands down - the best chocolate cookies I've ever eaten!

Just to give you an idea of their decadence . . .

One pound of melted semi-sweet chocolate is added to the batter; that, along with 4 eggs! Making for deliciously chocolaty cookies that are incredibly moist and chewy. 

They remind me somewhat of a brownie, but in the form of a cookie. 


I offer them on my catering/baked goods menu . . . and they're always a hit.

During the holidays, I add Andes Creme de Menthe or Peppermint Crunch (along with semi sweet chocolate chips) to the batter to add a festive twist . . . and they're soooo good!

So if you're looking for an amazing cookie to share with your family and friends this holiday season, then give these cookies a try. You'll LOVE them, too!


thick and chewy triple chocolate cookies
Resist the urge to bake the cookies longer than indicated; 
they may appear under baked at first, but will firm as they cool.
.      .      .      .      .      .      .      .
2 cups (10 ounces) all-purpose flour
1/2 cup Dutch processed cocoa
2 teaspoons baking powder
1/2 teaspoon salt
1 pound semi-sweet chocolate, chopped
4 large eggs, room temperature
2 teaspoons vanilla extract
2 teaspoons INSTANT coffee or espresso powder
10 Tablespoons unsalted butter, softened
1 1/2 cups packed light brown sugar
1/2 cup granulated sugar
2 cups semi-sweet chocolate chips
.      .      .      .      .      .      .      .


Adjust oven racks to upper middle and lower middle positions and heat the oven to 350 degrees F.

Line 2 baking sheets with parchment paper. 

Whisk flour, cocoa, baking powder and salt together in a medium bowl; set aside.

Microwave chocolate at 50 percent power for 2 minutes. Stir chocolate and continue heating until melted, stirring once every additional minute; set aside to cool slightly.

Whisk eggs and vanilla together in medium bowl, sprinkle with instant coffee over the top to dissolve, and set aside.

Using a stand mixer fitted with a paddle, beat butter, brown sugar, and granulated sugar at medium speed until combined, about 45 seconds; mixture will look granular. Reduce speed to low, gradually add egg mixture, and mix until incorporated, about 45 seconds. Add melted chocolate in steady stream and mix until combined, about 40 seconds, scraping down bowl as needed.

With mixer still running on low, add dry ingredients and mix until just combined. Do not over beat.
Fold in 2 cups of semi-sweet chocolate chips to batter. 

If you're adding Andes mints or Peppermint Crunch, then decrease semi-sweet chocolate chips to 1 cup; and add 2 cups of Andes.

Cover bowl with plastic wrap and let stand at room temperature until consistency is scoopable and fudgelike, about 30 minutes.

Working with 2 Tablespoons of dough at a time, roll into balls and place 1 1/2 inches apart on prepared baking sheets.

Bake until edges of cookies have just begun to set but centers are still very soft, about 10 minutes, switching and rotating baking sheets halfway through baking. 

Let cookies cool on baking sheet for 10 minutes; transfer cookies to wire rack and let cool to room temperature. (Courtesy Cook's Illustrated)


LET'S STAY in touch!


Sharing with . . . .

Stephanie Lynn, It's Overflowing, Twelve O Eight, Carrie This Home, Baking in Pajamas, Huckleberry Love, Dwellings, Smart Party Planning,  The Dedicated HouseMod Vintage LifeLori's Culinary Creations, Home Stories, StoneGableAn Extraordinary Day, I'm Not a Trophy Wife, Between Naps on the Front Porch, Rustic Refined,  Tumbleweed ContessaA Stroll Thru Life,Life With GarnishElizabeth & Co,  My Uncommon Slice of Suburbia, Savvy Southern StyleThe Recipe CriticJanine HuldieCarolyn's Homework,  Fluster Buster   Designs by Miss Mandee,  Craftie Allie,  Wednesday morning The Blissful Bee,  The Newlywed Pilgrimage Chic California, Lamberts LatelyLive Laugh RoweSweet Bella Roos, The Charm of Home, From My Front Porch to ours, Delightsome Life.Posed PerfectionKatherine's CornerNancherrowThe Freshman Cook,  Jann OlsonHome  Maid SimpleAnderson + Grant,  Rooted in ThymeEveryday Enchanted Home, Pure Grace Farms A Dish of Daily Life, Bacon Time, Sunflower Supper Club, Tater Tots and Jello,  Cooking with CurlsMade from PinterestSimply Gloria


Friday, October 17, 2014

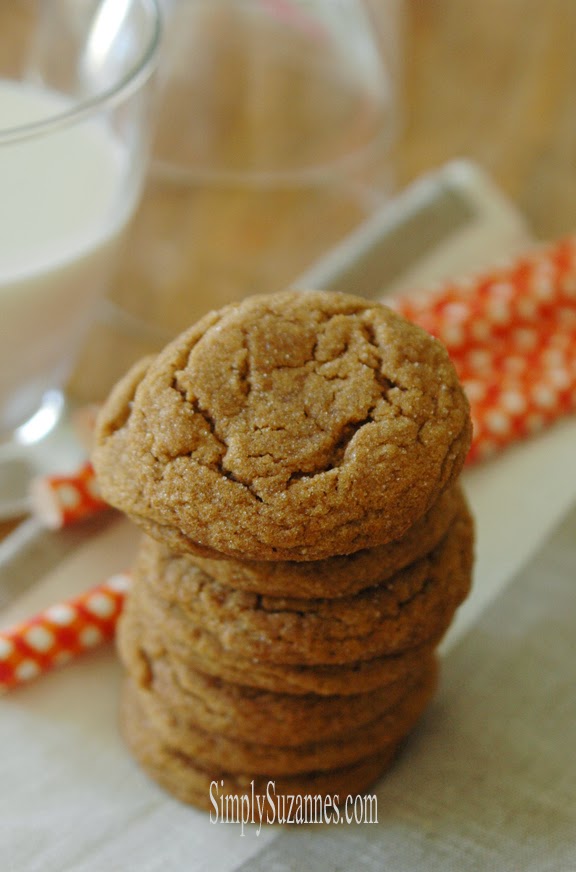
molasses spice cookies . . .


My husband  had a craving for cookies over the weekend, and I wracked my brain trying to think of a cookie that features all the warm flavors of Fall . . . and remembered a recipe for molasses spice cookies that I saw in my Cook's Illustrated Cookbook a few weeks ago.


They're tender, moist, chewy . . . and FULL of the warm flavors of Fall . . . cinnamon, ginger, cloves, allspice, molasses . . . and they're so so so yummy!

We even made a few of them into ice cream sandwiches using vanilla bean ice cream . . . YUM!

As for me, I enjoyed them with a cup of Brown Sugar Cake coffee (I LOVE Gloria Jean's!) . . . again, YUM!

I hope you find time to treat yourself and your family and friends to these amazing little cookies this weekend.


molasses spice cookies
1/2 cup,  plus 1/3 cup granulated sugar
2 1/4 cups all-purpose flour
1 teaspoon baking soda
1 1/2 teaspoons ground cinnamon
1 1/2 teaspoons ground ginger
1/2 teaspoon ground cloves
1/4 teaspoon ground allspice
1/4 teaspoon pepper
1/4 teaspoon salt
12 tablespoons unsalted butter, softened
1/3 cup packed dark brown sugar
1 large egg yolk
1 teaspoon vanilla extract
1/2 cup light or dark molasses
.     .     .     .     .     .     .

Preparation
Adjust oven rack to middle position and preheat oven to 375°F. Line two baking sheets with parchment paper. 
Place 1/2 cup granulated sugar on a plate or shallow baking dish.
Whisk flour, baking soda, cinnamon, ginger, cloves, allspice, pepper, and salt together in a medium bowl and set aside.
Using a stand mixer fitted with a paddle, beat butter, brown sugar, and remaining 1/3 cup granulated sugar on medium-high speed until light and fluffy, about 3 minutes. Reduce speed to medium low and add egg yolk and vanilla, beat until incorporated. On medium-low speed add molasses and beat until combined, about 20 seconds scraping down bowl as needed. Reduce speed to low and add flour mixture; beat until incorporated, about 30 seconds. Give the dough a final stir to ensure that no flour pockets remain. Dough will be soft.
Working with 1 Tablespoon of dough at a time, roll into balls. Roll half of dough balls in sugar and toss to coat. 
Place the dough balls 2 inches apart on prepared baking sheet. Repeat with remaining dough.
Bake 1 sheet at a time until cookies are browned, still puffy, and edges have begun to set but centers are still soft (cookies will look raw in between cracks and seem underdone), about 11 minutes. 
Do not overbake.

Let cookies cool on baking sheet for 5 minutes; transfer to a wire rack and let cool to room temperature.


Thursday, April 10, 2014

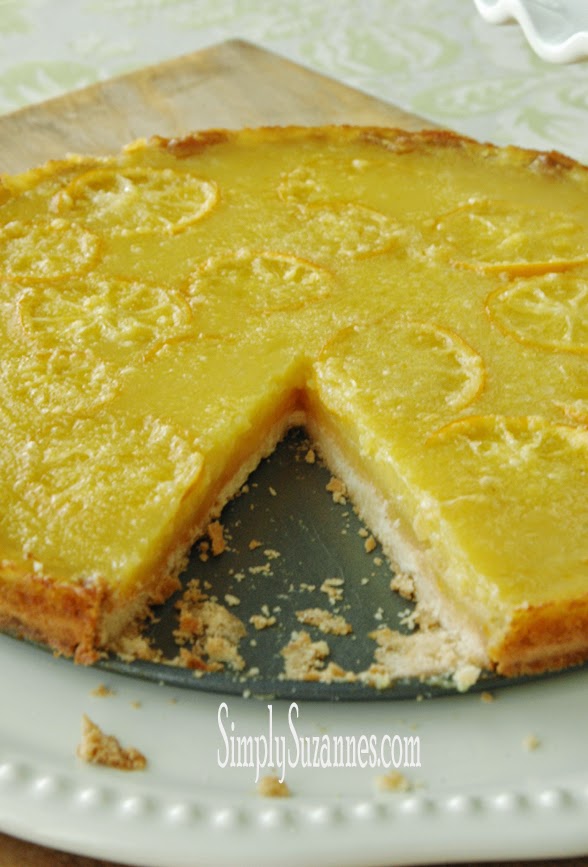
lemon & honey tart with salted shortbread crust


Two of my favorite food magazines are bon appetit and Cooks Illustrated. Have you heard of them? Both boast incredible, inspiring photos, delicious recipes, and if you're interested in how to make fool-proof, amazing dishes and desserts then Cook's Illustrated is your magazine.

I have several years of back issues . . . and I refer to them often. They fill many baskets throughout our home.

While glancing through the January 2013 issue of bon appetit I came across this gorgeous photo of a lemon honey tart with salted shortbread crust. Oh. my goodness. Isn't it beautiful!?!


I was completely drawn in by the slices of lemon suspended in the tart. The recipe revealed that these beautiful slices were from Meyer lemons. Have you ever baked with them? They remind me of a cross between a lemon and a mandarin . . . and can sometimes be slightly orange. Meyer lemons have a sweeter, more floral taste than regular lemons, making them great additions as fruit rather than just juice . . . and for adding lemon flavor without the mouth-puckering sourness of other lemons.


Bon appetit knew what they were doing when they paired Meyer lemons and honey, given that both have floral undertones . . . and compliment one another. Add a slightly salted shortbread crust and you have a perfect combination of sweet and salty. The lemon slices add a hint of zing, which rounds out this tart beautifully.


This recipe is very similar to making lemon bars, except that there's one more step. You'll make a honey and sugar mixture for the lemon slices to soak in, in advance.  This is an important step, as it softens the slices and tames any traces of bitterness.


Wouldn't it be gorgeous for an Easter brunch, a shower, tea party, or a Summer dessert?

It will certainly be the Bell of the Ball on our Easter brunch table!


Ingredients
CRUST 
Nonstick vegetable oil spray
1 3/4 cups all-purpose flour
2 tablespoons cornstarch
1 1/4 teaspoons kosher salt
3/4 cup (1 1/2 sticks) unsalted butter, room temperature, cut into 1-inch pieces
2/3 cup powdered sugar

FILLING & Assembly
1 LARGE Meyer lemon, if possible (a larger Meyer will yield more slices, which makes for a prettier tart)
1 cup sugar
3 Tablespoons honey
1 Tablespoon finely grated Meyer lemon zest
3 large eggs
2 large egg yolks
1/4 cup all-purpose flour
2 teaspoons cornstarch
1/4 teaspoon kosher salt
2/3 cup fresh Meyer lemon juice (about 10 Meyer lemons)
      
Preparation
CRUST
Coat spring form pan with nonstick spray. Whisk flour, cornstarch, and salt in a small bowl; set aside. Place butter and powdered sugar in a food processor. Pulse until mixture is smooth. Add dry ingredients to food processor and pulse until mixture resembles medium-size pebbles (dough will not come together completely). Transfer dough to prepared pan. Using your fingers, press dough evenly onto bottom and 1 1/2 inches up sides of pan.
DO AHEAD: Crust can be prepared 1 day ahead. Cover and chill.

FILLING & Assembly
Using a mandolin, slice Meyer lemon into paper-thin rounds. If you don't have a mandolin, then use a small serrated knife and cut very THIN slices. Remove seeds. 
Using a whisk, mix the sugar, honey, and lemon zest in a medium bowl. Add lemon slices and using a spoon, GENTLY toss to coat. Let sit until lemon is softened and sugar is dissolved, 60 minutes.
DO AHEAD: Lemon slice mixture can be made 1 day ahead. Cover and chill.

Place rack in upper third of oven; preheat to 325°. Bake crust until center is firm to the touch and edges are beginning to turn golden brown, 30-35 minutes.

When crust is almost done baking, whisk eggs and egg yolks in a medium bowl to blend. 
Whisk flour, cornstarch, and salt in a small bowl; add to egg mixture and whisk to combine. 
Whisk in lemon juice. Add lemon slice mixture; mix GENTLY to combine.

Reduce oven temperature to 300°. Pour filling into hot crust. Using a fork, move the lemon slices around so that there is even coverage. 

Bake until filling is set and slightly puffed around edges, 35-40 minutes. Transfer pan to a wire rack; let cool completely. Chill for at least 4 hours, then unmold. Serve cold.

DO AHEAD: Tart can be made 2 days ahead. Cover and keep chilled.

**I've read many reviews that this tart does not work with regular lemons, only Meyer lemons. Regular lemons are too tart and bitter.


LET'S STAY in touch!


Sharing with . . . .

Suburbs Mama, The TablescaperStephanie Lynn, Twelve O Eight, Carrie This Home, Cooking for the Seven Dwarves, Huckleberry Love, Dwellings, The Dedicated HouseMod Vintage LifeCedar Hill FarmhouseStoneGableAn Extraordinary DayBetween Naps on the Front PorchTumbleweed ContessaA Stroll Thru Life, The Comforts of HomeElizabeth & Co,  My Uncommon Slice of Suburbia, Savvy Southern StyleCity Farm HouseChef in Training, The Recipe CriticOur Home Away From HomeFinding FabulousThe Style SistersThe Comforts of Home, Fluster Buster,Kitchen Meets Girl, Lady Behind the Curtain Wednesday morning The Blissful Bee,  The Newlywed PilgrimageNo Minimalist HereLamberts LatelyLive Laugh Rowe, Sweet Bella Roos, The Charm of Home, From My Front Porch to YoursSimply Dream and Create Delightsome Life. Katherine's CornerNancherrow Jennifer RizzoJann OlsonHome Maid Simple, 504 Main52 MantelsLiving Better Together,  Common GroundThe Cottage MarketBacon Time, Sunflower Supper ClubChic California, Tater Tots and Jello,  Cooking with CurlsMade from PinterestSimply GloriaSewlicious Home Decor


Related Posts Plugin for WordPress, Blogger...